After the Battle of Portland Bill on August 2nd, Lord Charles Howard led his 100-ship strong fleet in four columns behind the Spanish Armada which had resumed its stately advance up the English Channel. At first light of the following day, August 3rd, Sir Francis Drake’s column came across the 650-ton flagship of the Armada’s Supply Squadron, Gran Grifon, which had fallen out of formation. Its captain, Juan Gomez de Medina, had not been vigilant during the night and he regretted it now. Drake immediately charged forward with his column and blasted Gran Grin from close range for over an hour. Most of the Spanish rearguard eventually tacked up wind to the rescue but after an inconclusive clash, Drake led his ships upwind without incurring significant casualties or shipboard damage. A galleass towed the stricken Gran Grin back into the Armada formation. Drake’s attack killed 60 Spaniards and injured scores more. It was a bloody harbinger of things to come.
Later that day, the wind died down and both fleets were becalmed for the remainder of the day and night. Dawn of August 4th found them several miles out to sea below the Isle of Wight’s midpoint. Rear Admiral John Hawkins aboard Victory was delighted to see two straggling Spanish ships in front of his column. He ordered longboats to tow his column’s warships within range of the stragglers and he engaged them in a stationary artillery duel for a couple hours. The stragglers were the royal galleon Luis de Portugal and Santa Ana, an armed merchantman of the Andalusian Squadron. Three galleasses came to their rescue towing the huge armed carrack La Rata Encoronada (commanded by Alonso de Leyva). The galleasses harassed Hawkins’ ships and chased off his longboats. Howard (aboard Ark Royal) and his kinsman Lord Thomas Howard (aboard Golden Lion) were towed over to join the artillery duel. The galleasses eventually hauled the stricken stragglers back into the fleet. The cobelligerents mutually disengaged from the fight once the wind came up.
While Hawkins and Howard were fighting the Spanish rearguard, Rear Admiral Martin Frobisher aboard the huge greatship Triumph was isolated from the main body of the English fleet. He was in command of the inland column which had drifted farther than anticipated eastward during the night. At dawn he found himself opposite the headland of Dunnose and was separated from his five London merchant escorts by a few miles. Worse, the Spanish main body was interposed between him and the other English columns which were positioned southwestward and further out to sea.
The Spanish High Admiral, the Duke of Medina Sidonia (assigned at the front of the vanguard) had ordered a galleass to tow his giant galleon San Martin up to Triumph and an artillery duel from medium range transpired for quite some time. The escorting galleass got behind Triumph and damaged her rudder head with a cannon ball. When the wind arose from the southwest, Medina Sidonia broke off from the fight and headed west with the galleass to order the ships at the landward tip of the Armada to move shoreward to cut off Frobisher’s escape route (the landward shoals would cut off his retreat from the opposite quarter). Despite his peril, Frobisher could not sufficiently maneuver Triumph to catch the wind and he noticed many enemy ships approaching to grapple and board him. Fortunately, his distant escorts sent 11 longboats to tow Triumph westward and keep her out of reach of the Spanish pursuers. When the wind picked up, Frobisher was able to hug the coastline and escape under full sails before the Armada’s landward wing could close trap him.
Howard had noticed Frobisher’s predicament from afar and afterward tried to barge his way through the Spanish rearguard to come to his rescue. Ark Royal was almost grappled by Vice Admiral Recalde’s San Juan and several other Spanish galleons but Howard staved them off with the help of two enormous English galleons, White Bear and Elizabeth Jonas. The English relief force fired prodigiously into the Spanish ranks and drove them back. Seeing Triumph‘s escape, Howard disengaged from the fight and led his column up wind to conduct minor repairs and ammunition replenishment from supply ships.
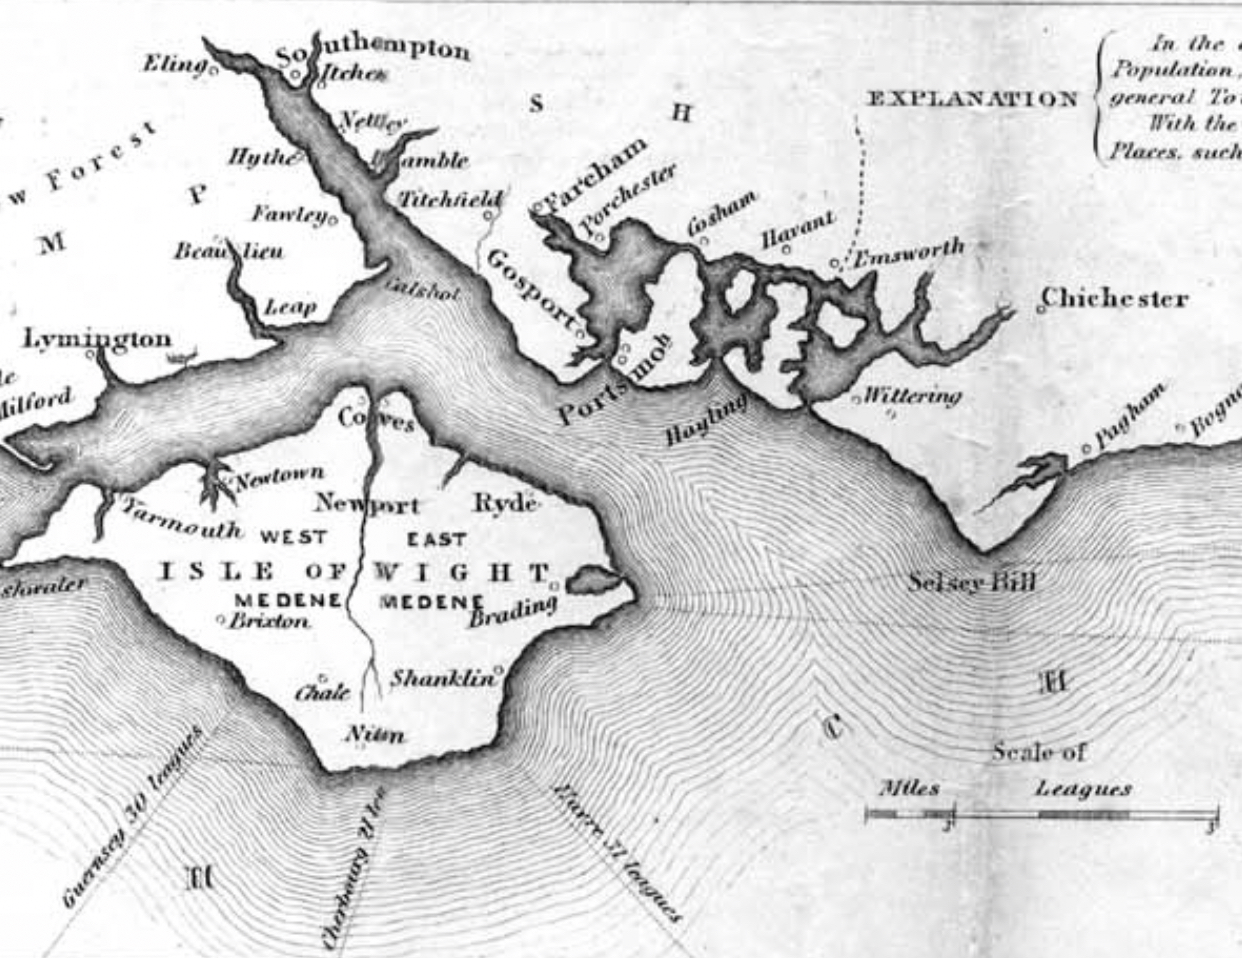
After the fight, Medina Sidonia tried to reform the Armada’s ranks. He took counsel from his advisors who wanted to shelter in the secure Spithead Anchorage directly inside the nearby mouth of the Solent (behind the Isle of Wight). Medina Sidonia had previously agreed to pause at Spithead and await communications with the Duke of Parma before advancing further up channel. He had dispatched swift vessels to advise Parma of the Armada’s approach so he could be prepared to embark his army in barges from Dunkirk as soon as the Armada arrived. Medina Sidonia did not want to linger in the open shoreline along Picardy, France while awaiting Parma’s embarkation. There was yet no word from Parma but the winds and tides were perfect for entering the Solent where the Spanish might secure fresh water and extort or steal ammunition while awaiting communications. Unfortunately for the Spanish, Drake had something else in mind.
During the fighting on the landward side of the Armada’s formation, Drake had declined to offer battle from the seaward side. Instead, he had merely demonstrated to keep the adjacent Spanish ships from joining the fight against Hawkins, Howard and Frobisher. After the fighting stopped, Drake held a quick war council with his friend John Hawkins whose column was immediately adjacent to his and further shoreward. They were both worried that Medina Sidonia might make a go for Spithead, so Drake and Hawkins decided to attack the seaward Spanish rearguard and herd them toward a line of shoals known as the Owers that ran southeast from Selsey Bill (on the far side of the Solent’s mouth). The Owers were not readily visible from the surface except for discoloration in the water and they hoped the Spanish would not notice their peril until it was too late.
Drake advanced his column against the seaward wingtip of the Armada and drove back the mighty San Mateo, then the giant Florencia, while Hawkins attacked from his adjacent sector. The English ships drew close and fired broadsides at enemy rigging to degrade their foes’ mobility and drive them back (northeastward) toward the shoals. The proverbial good order of the Spanish formations was impaired and the rearguard decoupled from the vanguard which remained fixed on the spent columns of Howard and Frobisher further inland. 
At the last minute, Medina Sidonia was apprised of the peril of the shoals and he abandoned the notion of entering the Solent. Instead, he turned his vanguard ships 90 degrees southeastward and skirted the Owers on the way out to sea. The Spanish rear guard formed up and followed him. By mid-afternoon the Armada had resumed its formidable crescent formation and resumed its trek up the English Channel. Howard’s four columns followed them as before. There was no suitable English port remaining for the Spanish to seek shelter in. Both sides knew that a climatic battle would have to be fought off the open French coastline near Calais.

Leave a comment